Guilt-Free Collagen Peanut Butter Cups

Well, Joe and I have been watching what we eat because our wedding is less than 2 months away.
We aren't being like, totally crazy bridezillas about it, but we are trying to nourish ourselves with real food so that we look and feel our best at our wedding and on our honeymoon in Hawaii.
So to tame our internal cookie monsters, I've been whipping up some healthy treats, namely collagen peanut butter cups.
You may remember my freezer fudge post from a while back. These peanut butter cups are kinda like that. However, this recipe has been a part of my life since way before the freezer fudge stage. I used to make these peanut butter cups in college a lot. I was originally inspired by a recipe from Alicia Silverstone's macrobiotic/vegan book The Kind Diet which I was kind of obsessed with for a while. That is, until I realized that the suggested lifestyle was totally unrealistic for a busy, poor college student like myself.
Anyway, I've been making some version of this chocolate peanut butter cup recipe for several years. Sometimes I make them completely vegan, sometimes I make them with real sugar, and sometimes (the most recent times) I make them with collagen. I've been talking about collagen a lot lately and that's because I've been pulling out all the stops for my bridal beauty prep.
Here's what you'll need to make these badass collagen peanut butter cups:
- Crunchy peanut butter (I am partial to Adam's No-Stir)
- Ghee (I like the Himalayan Pink Salt kind from 4th & Heart)
- Whole wheat graham crackers (100% whole wheat can be hard to find so I usually end up getting Annie's Honey Grahams)
- Granulated stevia
- Collagen powder (I've been using the grass-fed collagen peptides from Sports Research)
- Vanilla extract
- Semi-sweet / dark chocolate chips (I like Lily's because they're sweetened with Stevia, although they're pretty expensive)
- Unsweetened vanilla almond milk
- Flake salt
- Mini baking cups
Here's what you do:
(I don't measure things. Welcome to my recipes.)
1. Put some of the graham crackers in a ziplock bag and crush them up with a big spoon or small bowl until you have maybe a cup of graham cracker crumbs.
2. In a small sauce pan on low heat, mix together about half the jar of peanut butter, 2-3 big spoonfuls of ghee, a couple scoops of collagen powder, a little drizzle of vanilla extract, and granulated stevia to taste. (Stevia is much sweeter than regular sugar, so you'll need a lot less.)
3. When the peanut butter mixture is smooth(ish) and tastes sweet enough, carefully spoon it into the baking cups until they're about half full.
4. Put the baking cups with the first layer in the freezer for about 20 minutes. (I like to put the baking cups on a plate and place it in the freezer.)
5. While the first layer is hardening, get another little saucepan (or clean the first one out) and heat about half the bag of chocolate chips on low with some almond milk and stevia to taste. The goal of this step is to create a sweet(ish) melted almond milk chocolate. It doesn't have to be that sweet, though, because the peanut butter part will balance the flavors out. You can add a little vanilla extract at this step too, if you want.
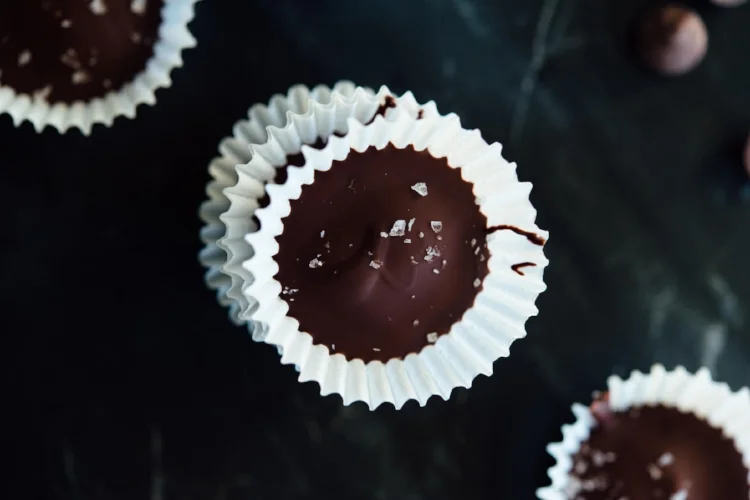
6. When the chocolate is melted and tasting less bitter, carefully spoon it into the mini baking cups on top of the peanut butter layer.
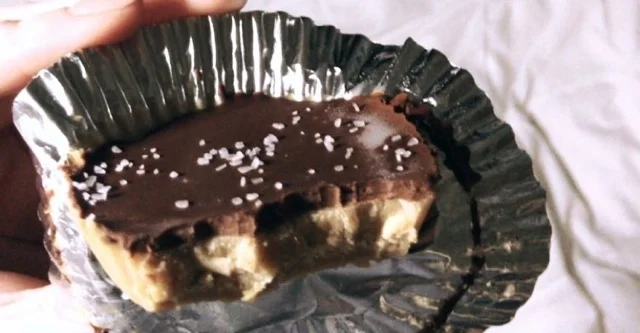
7. Sprinkle a little flake salt on top of the chocolate layer.
8. Place the plate of peanut butter cups back in the freezer. They will be ready to eat in about a half hour and completely frozen within a few hours. Once they're completely frozen and firm, you can take them off the plate and put them in a big ziplock or tupperware container so they stay fresh longer.
That's it, guys! You can obviously do whatever you want with this recipe and use whatever measurements your heart tells you. Use real sugar, use coconut sugar, use honey, use regular butter, use creamy peanut butter, use two layers of chocolate.....I don't care what you do—go nuts!
Oh, and about the whole "guilt-free" thing: Your desserts don't need to be guilt-free and you don't need to feel guilty about eating dessert! The title of this post is mostly about click-bait and the recipe is especially clean because I've been eating clean as of late. Be yourself!
Follow me on Instagram (if you don't already) for more healthy treats and lazy dinners. Peace out!